

For more information: Recommended Links | Frequently Asked Questions
Copyright © 2018 by Michael Ray Brown. All rights reserved.
“First rate analysis at a cut-rate price.”
— Creative Screenwriting


Script Format: Montages
Writers are often confused about how to present a series of short scenes that are illustrative or transitional in nature. When the shots are so short and disjointed as to make it awkward to present them as scenes, then a “SERIES OF SHOTS” is the answer.
Montages, on the other hand, are usually transitional, with each shot dissolving into the next one, and they often don’t involve the principal characters. For example, a montage of a flight might include the airplane taking off, dissolving into an animated line showing its progress across a map, dissolving into a shot of the plane flying through the clouds, and finally dissolving into a shot of it landing.
Montages tend to be used less often than a series of shots. In either case, the images should not be random, but progress the narrative and build to a climax.
The text in each shot should wrap beneath the text, not beneath the letter of the outline. This is essentially a hanging indent. Unfortunately, most script formatting software cannot handle a hanging indent. You must insert a hard return at the end of each line, and then type four spaces to indent the next line. To prevent each line in a shot from being double-spaced, press “Shift” simultaneously with the “Enter” key.
Unlike with a flashback, there is no need to tell us when the montage or series of shots ends. We know it has ended when we see a new scene heading. Always start a new scene (with a complete heading) after a montage or a series of shots.
Montage or Series of Shots?


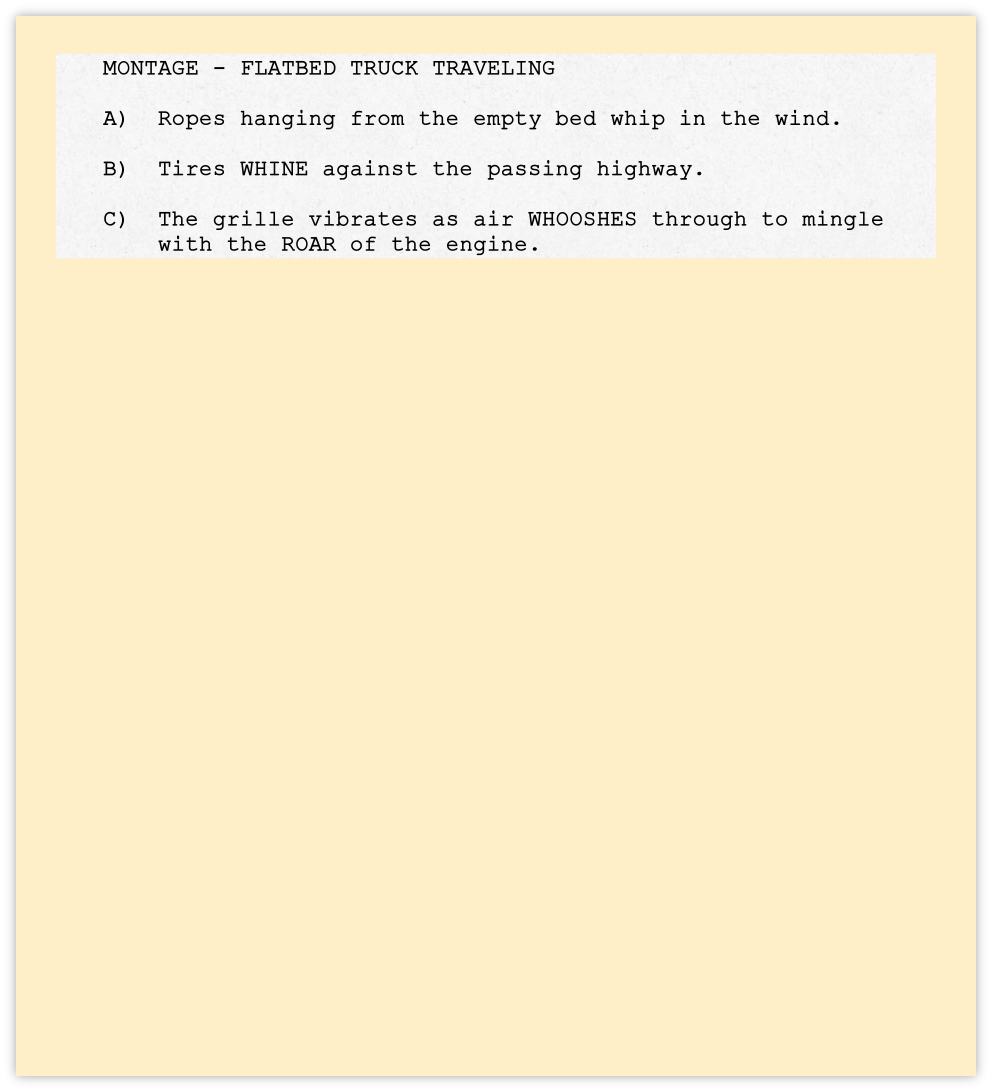
Standard screenplay format dictates that a montage or a series of shots begin with a slug line describing the content. It’s not sufficient just to describe what we see in a paragraph of action.
Each shot must be listed in alphabetical outline form, without a scene heading, starting with a capital letter “A” and a closed parenthesis, followed by two spaces:
 Next: Telephone Calls
| Development Notes |
| Oral Consultation |
| Studio-style Coverage |
| Selling Synopsis |
| Proofreading |
| Sample Script Analysis |
| Sample Coverage |
| Sample Selling Synopsis |
| SolPix Interview |
| Creative Screenwriting Interview |
| Scriptwriter Interview #1 |
| Scriptwriter Interview #2 |
| Scriptwriter Interview #3 |
| Scriptwriter Interview #4 |
| Elements of a Great Script |
| Margin Settings |
| Scene Headings |
| Slug Lines |
| Description |
| Character Cues |
| Dialogue |
| Personal Direction |
| Transitions |
| Flashbacks |
| Montages |
| Telephone Calls |
| Registration |
| Software |